DIY irrigation control with Home Assistant and ESPHome
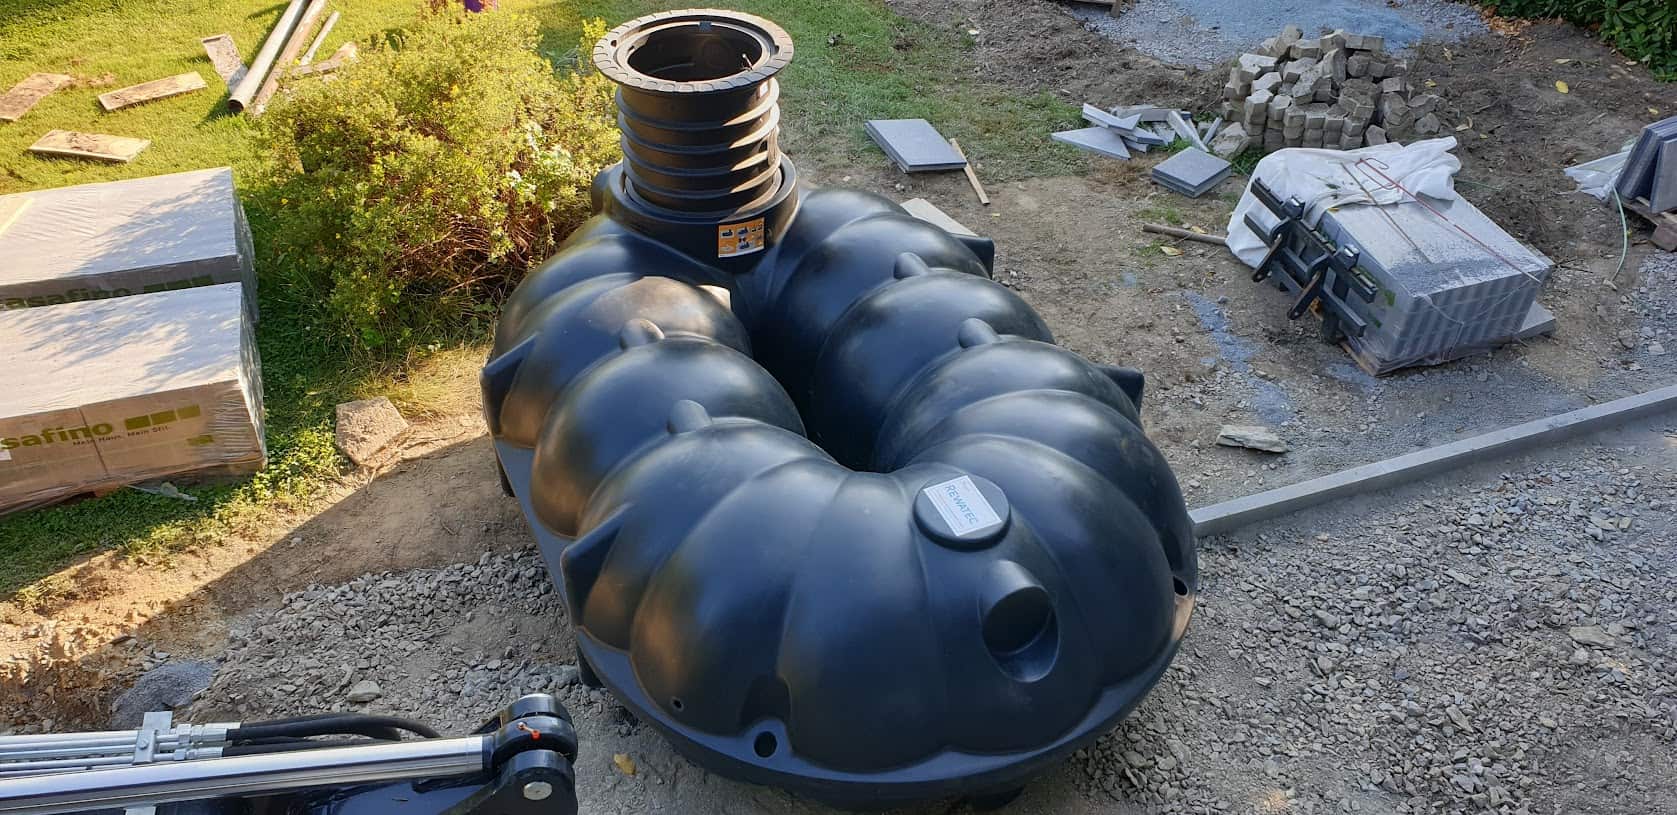
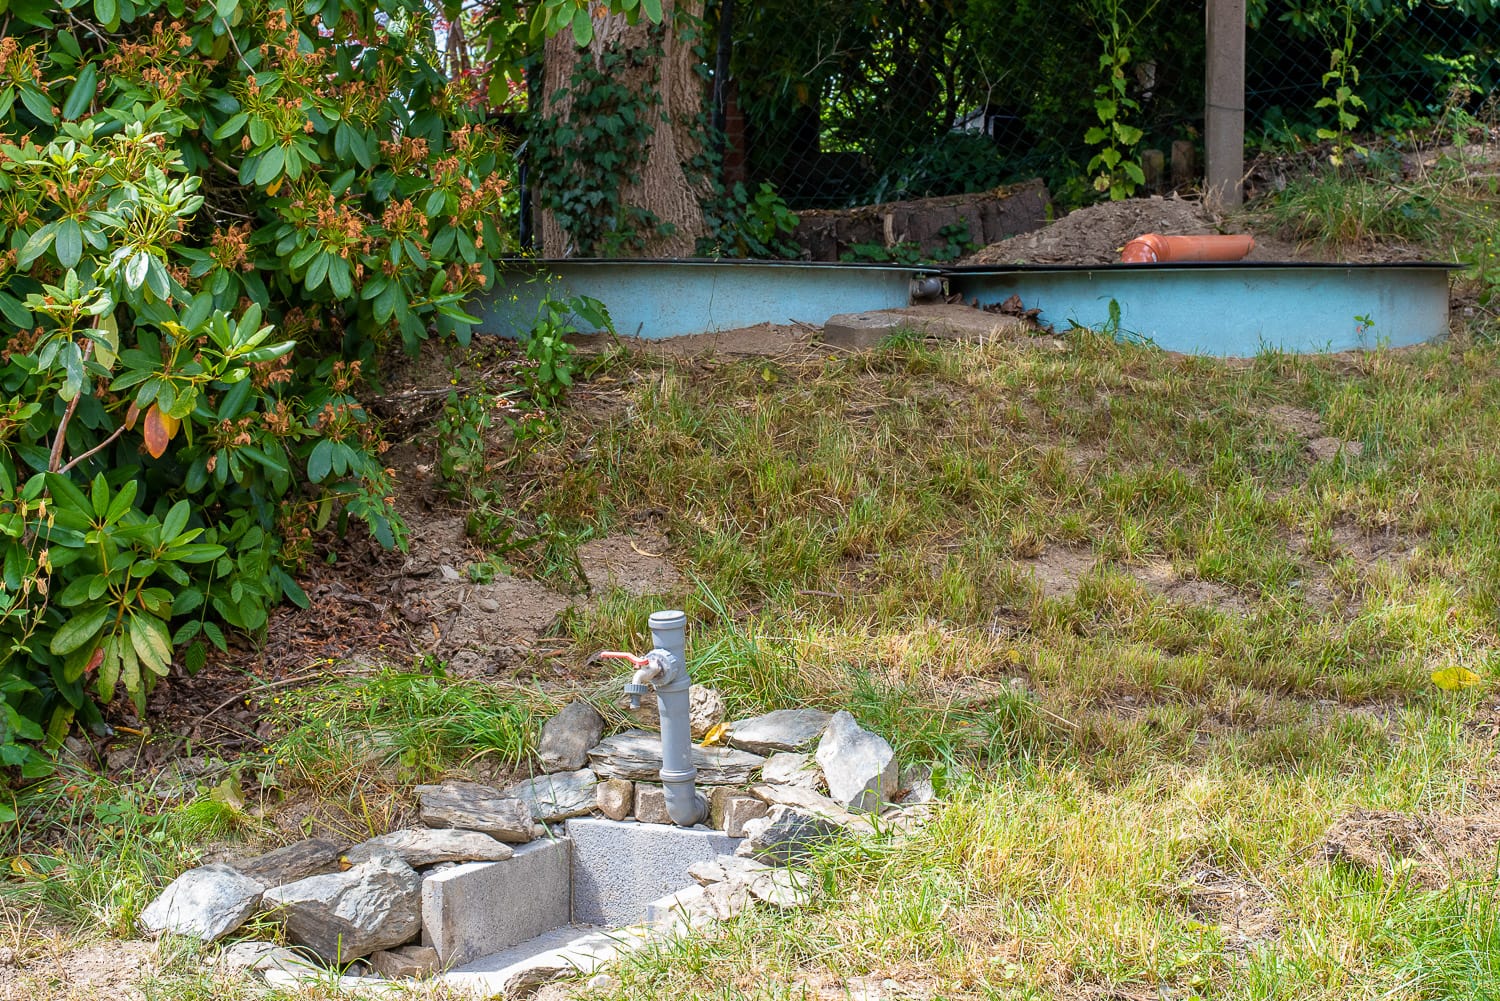
With our cistern, which we got last year as a buffer and with the new pipes for rainwater drainage, there is plenty of free water from the roof. At least when it rains again one day.
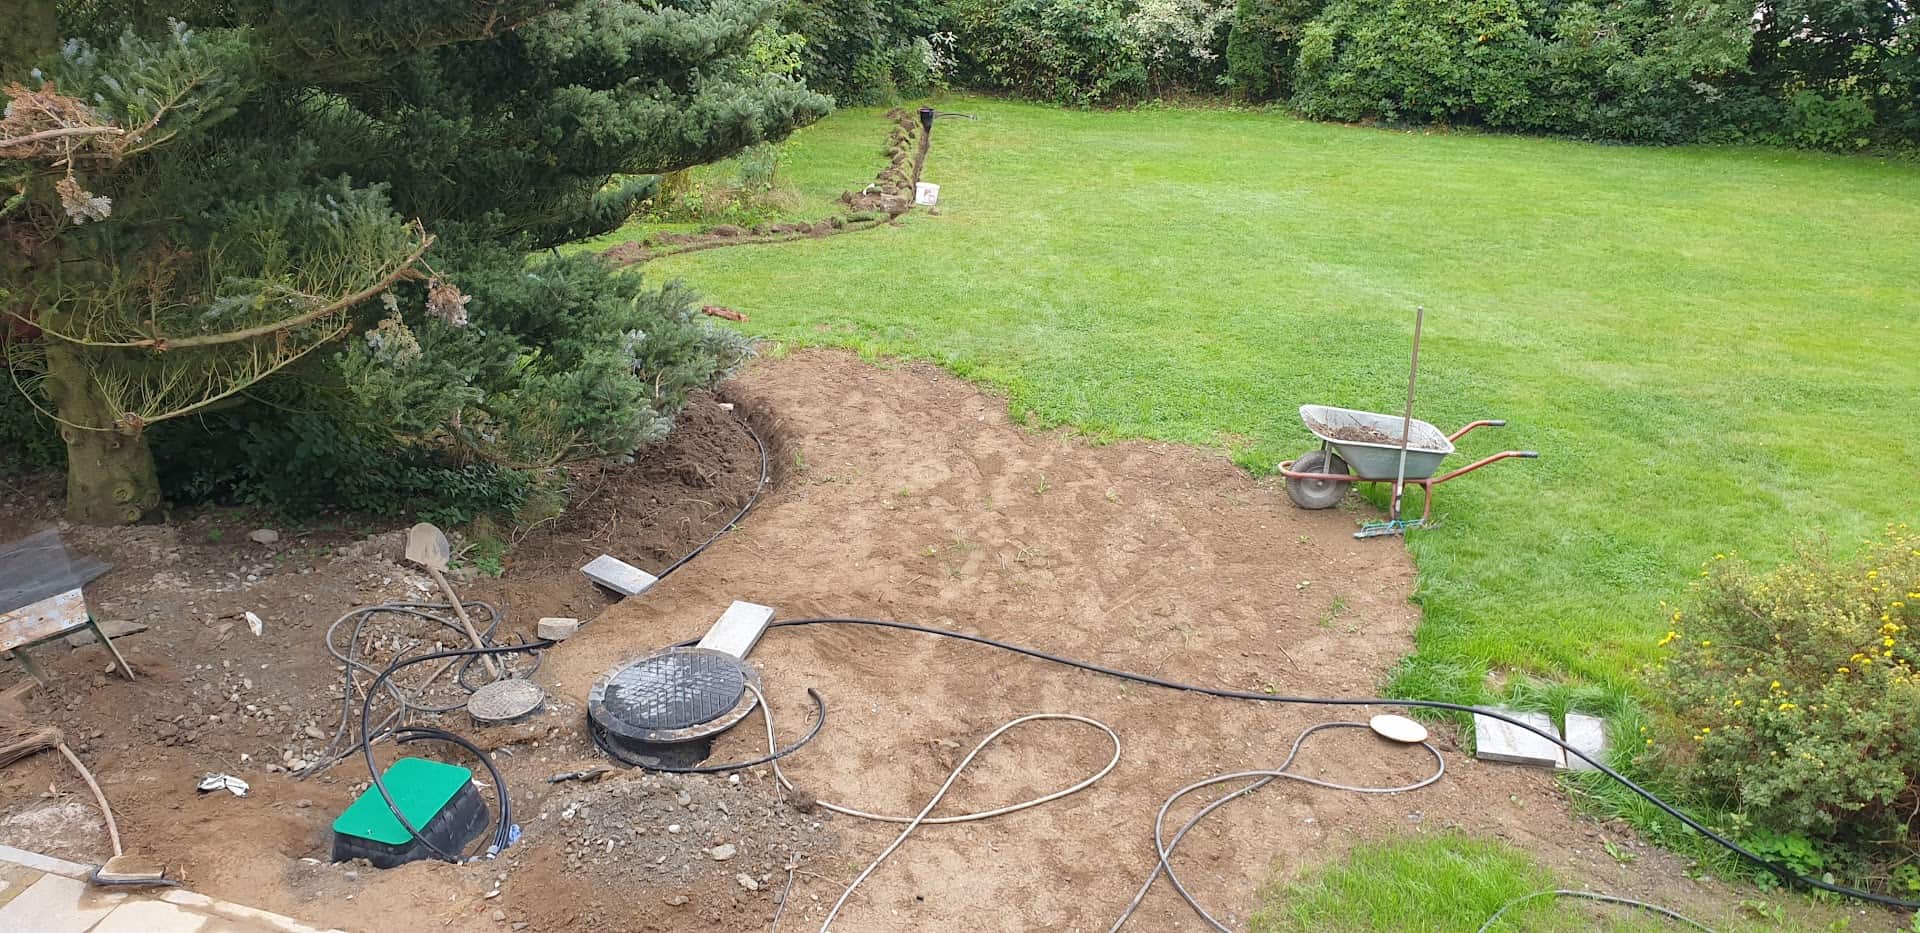
We have therefore laid pipes for automatic irrigation on the property, using the Gardena irrigation system, as these components were cheaper last year than the alternatives from Hunter or Rainbird.
We control 5 individual circuits via 5 valves:
- East lawn irrigation
- West lawn irrigation
- Raised bed / flower beds
- Front garden
- Water outlet in the driveway
The material used was

- 50 metres of Gardena laying pipe 25 mm
- 4 Gardena water sockets
- 3 Gardena T250 pop-up sprinklers
- 2 Gardena T380 pop-up sprinklers
- Several Gardena bends and T-pieces
- No-name valve box with 5 Hunter valves with flow control and ball valve with compressed air adapter for drainage/frost protection
- Renkforce submersible pressure pump
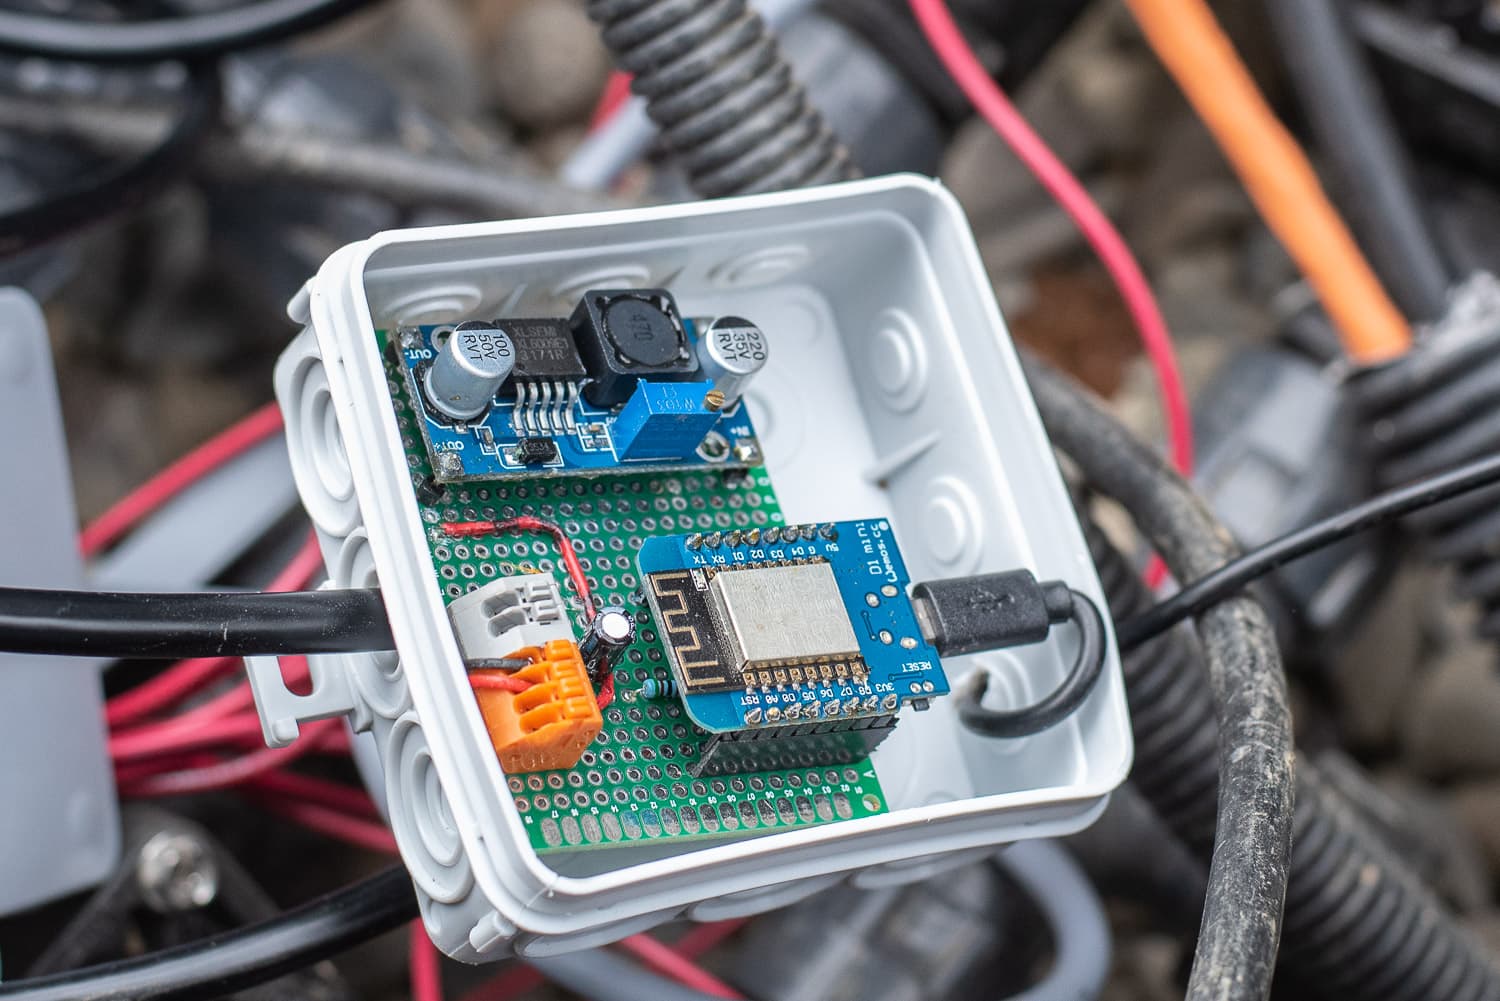
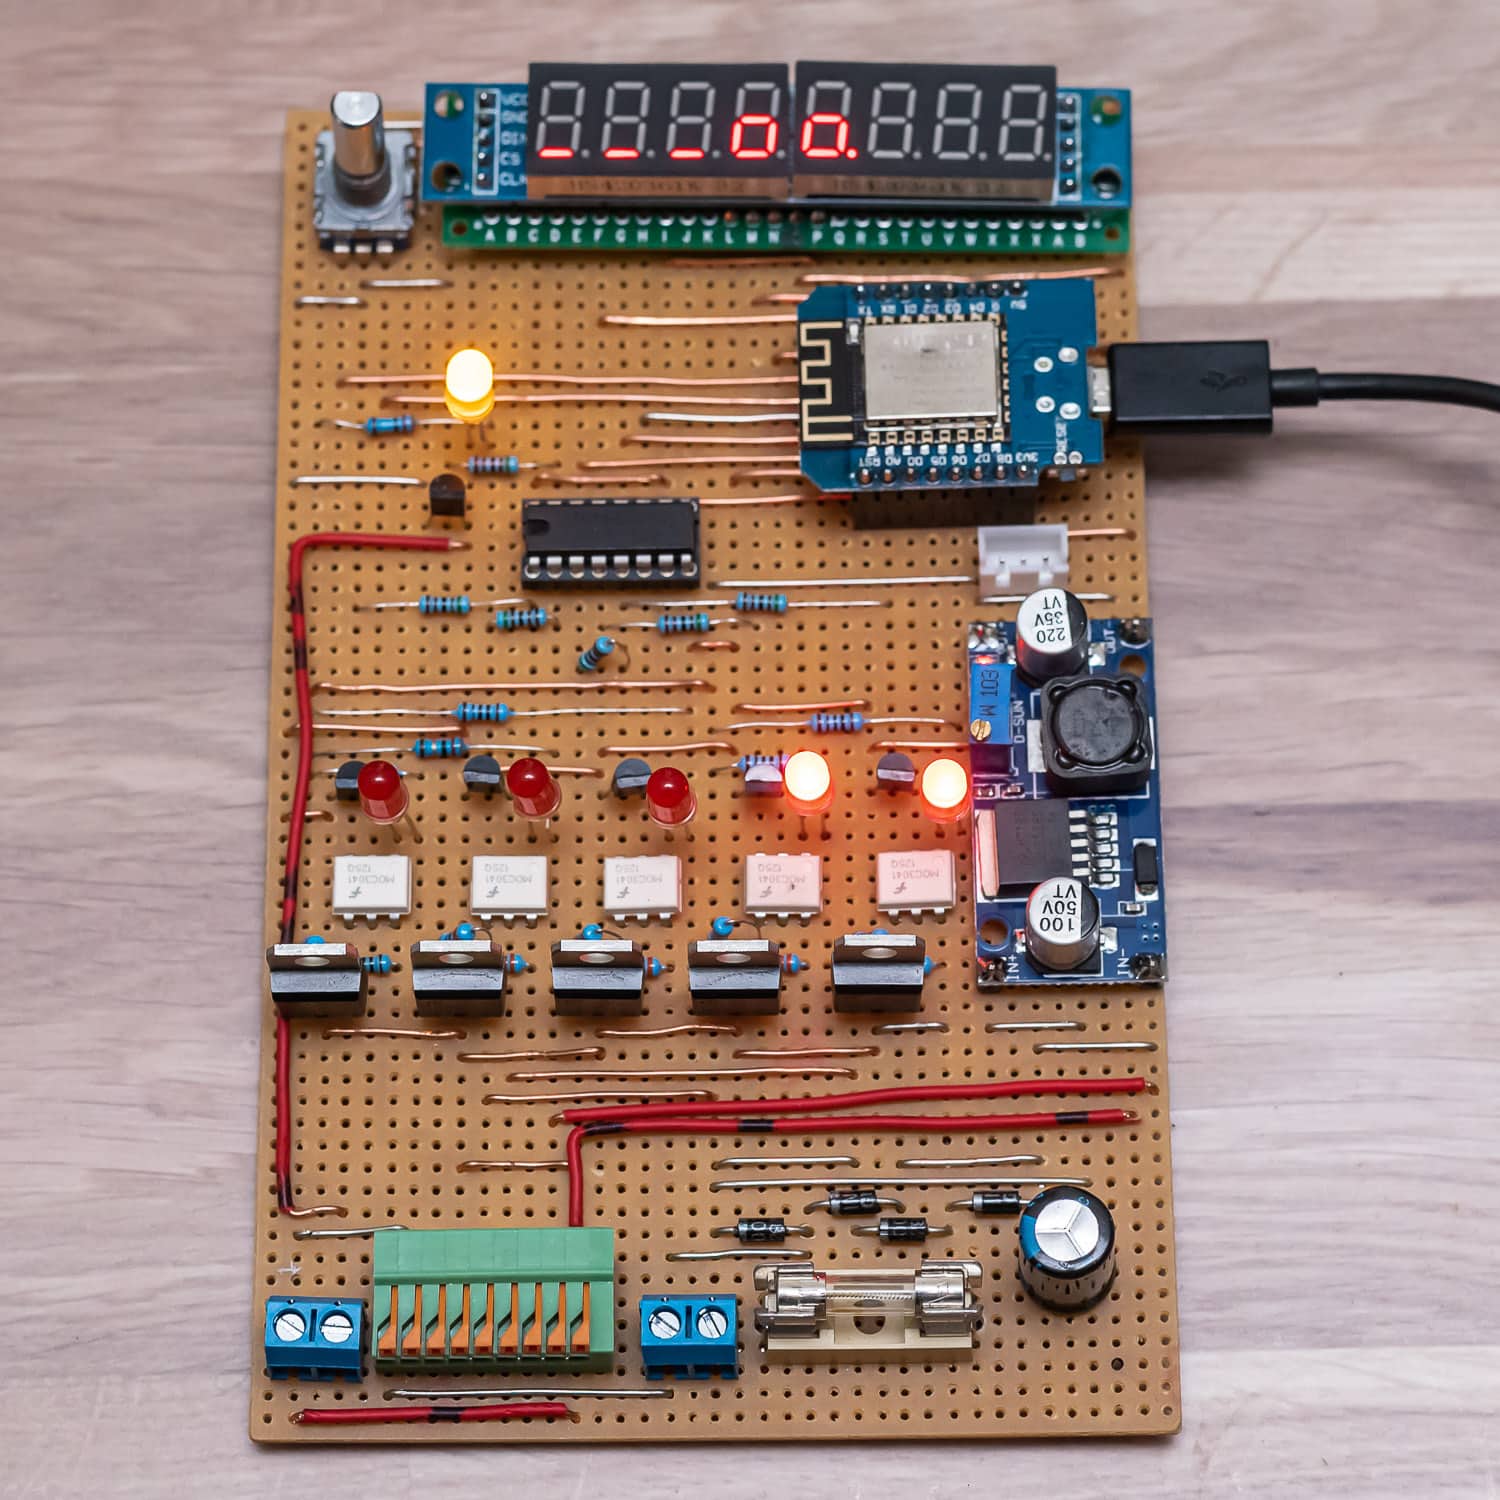
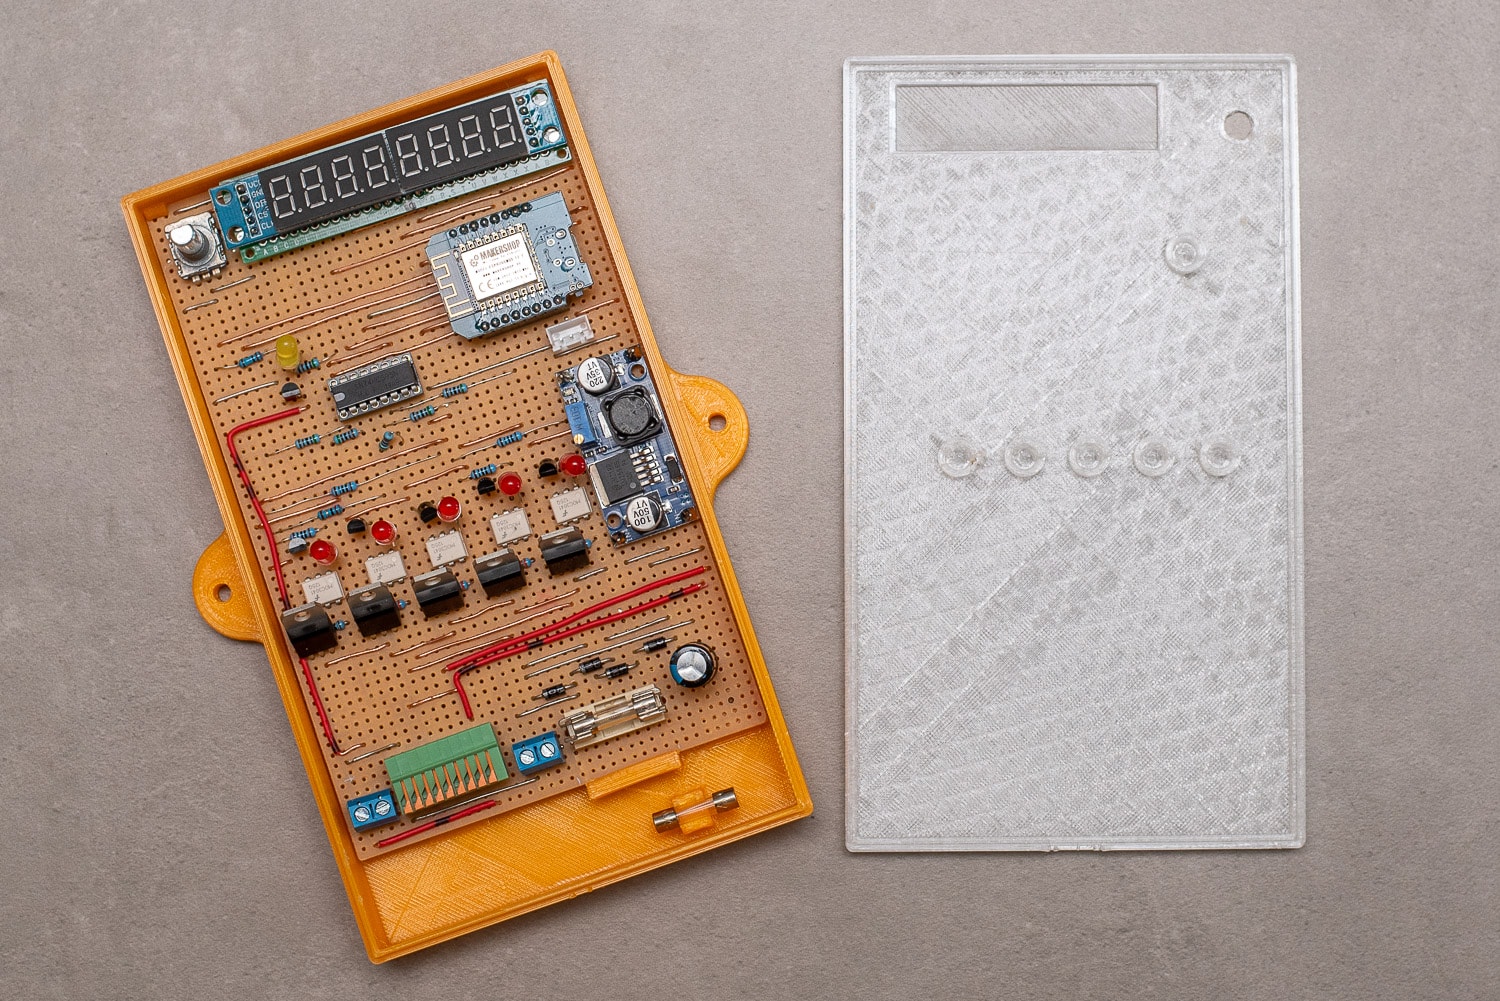
The electronics of the Waterking
The typical irrigation valves are controlled with 24 volts alternating current. According to the data sheet, the switch-on current is 370 mA, the holding current 210 mA. According to my measurements, the actual values were somewhat lower.
As all the valves are never in operation at the same time because otherwise the water pressure would drop too much (even with the 4 bar submersible pressure pump), a 24 volt AC power supply with 1 ampere is sufficient. I still had this from an old outdoor light chain. You can also find suitable power supply units on Ebay.

If the valves were operated with DC voltage, the cores of the electromagnets could become permanently magnetised and the valves would “stick”. In the worst case, the core would become saturated, which could mean a higher current flow and thus the destruction of the coils.
Therefore, MOSFETs cannot be used for simple control. The simplest solution would be relays, but I didn’t want to rely on that. Firstly, the contacts can corrode and the simple Chinese relays, which are available ready-made as 4 or 8-pin boards, are not necessarily suitable for switching low voltage. This sounds paradoxical, but most alloys used for relay contacts (AgCdO for these relays) require a short arc, which only occurs at higher voltages and currents (the so-called frit current). This burns away oxides, which ensures a permanently good contact. As there is also high humidity in the shed, relays were ruled out for me.
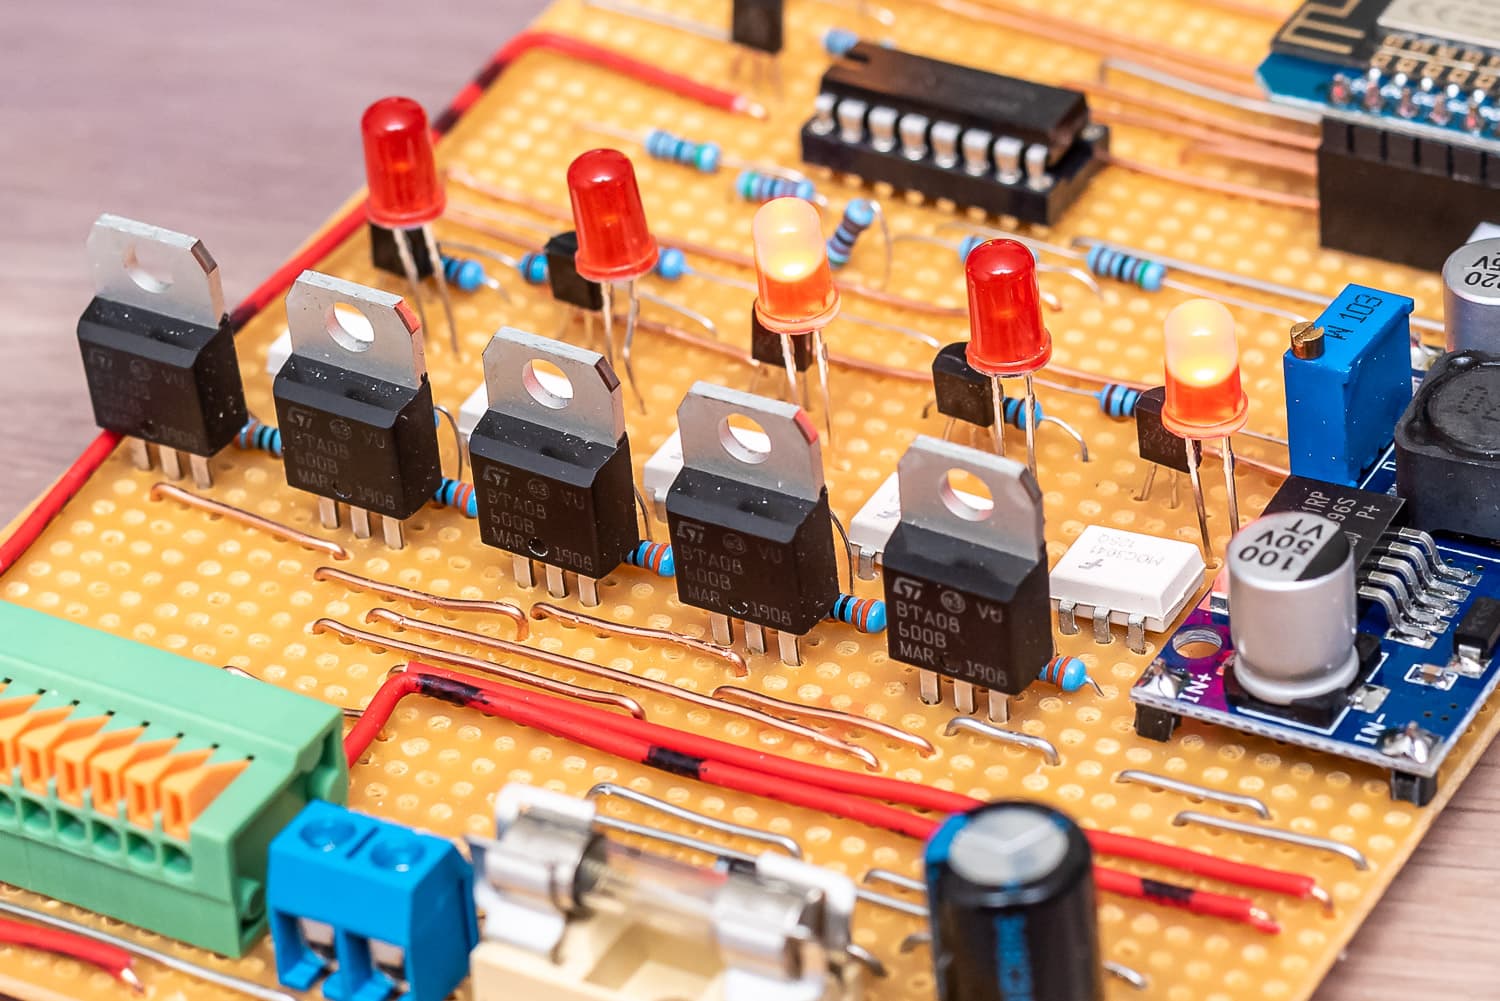
The triacs of the 5 channels with the white optocouplers
For my DIY controller, which I christened Waterking, I opted for BTA08-600B triacs, which are controlled via a MOC3041 optocoupler that also contains a zero-crossing triac driver. If you add 5 resistors, an NPN transistor and an LED, one channel costs less than one euro and you will never have contact problems. The LEDs indicate on the hardware side whether a valve is open and the optocoupler is activated.
As you already have the 24 volts, you can also use them to supply the ESP8266 and the display. Rectified, you get 35 V DC, which I convert very efficiently to 5 V using an LM2596S step-down converter.

As is often the case with my projects, a Wemos D1 Mini Pro is used because I bought a large quantity at a good price a long time ago. The Wemos is also utilised down to the (almost) last GPIO. I need 6 outputs to control 5 valves and our submersible pressure pump. Now you could use 6 GPIOs or use a shift register of type SN74HC595. This allows you to switch 8 outputs with 3 control pins. If you need more, you can cascade up to 4 SN74HC595 under ESPHome, for which you then need one more pin, but this gives you 32 outputs.
The pump is switched via a solid state relay (SSR).

- Mehrschichtiger wasserdichter Schutz IP68, 45-Grad-Schrägwinkel-Anti-Schock, abnehmbarer Anti-Blocking-Schutz.
- Eingangspegelgeber, hochpräzise Diffusion von Silizium, genauere Überwachung des Wasserstandes.
-
Das gemessene Medium ist Wasser, Öl und andere Flüssigkeiten, die Edelstahl nicht angreifen. 34,73 EUR
 Jetzt bei Amazon kaufen
Renkforce 1519501 Tauchdruck-Pumpe mit Schutzkontaktstecker 6500 l/h 30 m
-
Max. Fördermenge 6500 l/h
-
Max. Förderhöhe 30 m 83,56 EURJetzt bei Amazon kaufen
LAOMAO 5X Step-up Boost Power Converter XL6009 für Arduino Raspberry DIY-Projects basteln
-
Es handelt sich hierbei um ein Step-UP, Spannungsregler Aufwärtswandler oder Boost-Converter.
- Die Ausgangsspannung ist nach dem Umwandlung immer größer als die Eingangsspannung.
-
Die Platine wandelt Spannungen von 3V-32V, einstellbar an dem Potentiometer in 5V – 35V Volt um. 8,99 EUR
Jetzt bei Amazon kaufenKemo M167N Füllstandsanzeige für Wassertanks batteriebetrieben. Fernmessung bis 100 Meter. Für Regenwasser, Klärkammern, Gülletanks. Mit LED Anzeigen
-
batteriebetriebene füllstandanzeige
- misst füllstände von wassertanks wie regenwasser, klärkammern oder gülletanks
-
anzeige erfolgt nach knopfdruck über 10 led’s 31,19 EUR
Jetzt bei Amazon kaufenStrom zu Spannung Wandler Modul 0-20mA 4-20mA 0-3.3V 0-5V 0-10V Signalumformer DC DC Konverter Platine
-
BREITER AUSGANGSVOLATFE-BEREICH – Der Strom-Spannungs-Wandler hat einen weiten Versorgungsspannungsbereich und die Ausgangsspannung unterstützt mehrere Bereiche
- EINSTELLBAR – Der Strom-Spannungs-Wandler verwendet eine ausgeklügelte Produktionstechnologie, der 0-Punkt und der Vollbereich können selbst eingestellt werden
- KUNSTSTOFFMATERIAL – Das Konvertermodul besteht aus hochwertigem Kunststoff und hat eine hohe Stabilität, gute Linearität und Industriequalität
6,45 EUR
Jetzt bei Amazon kaufen
Originally, my controller was supposed to remain “dumb”, i.e. only make the triac outputs switchable via Home Assistant. But if you already have a microcontroller, you might as well add a few extra functions. For example, the valves switch off after a configurable time (10 minutes). If no valve is active, the pump is also deactivated. If the WLAN connection is lost during irrigation or Home Assistant has a bug, the valves and pump switch off automatically and autonomously. I built everything on a strip grid board. I’m “Team Strip Grid” – I just don’t like the messing around with solder on the perfboards.

Please understand that I don’t have a plan for the layout of the board. I do things like this freely and without much pre-planning directly from the circuit diagram. Just test the position of the parts and off you go. Maybe I’ll add a circuit board layout with KiCAD when I get the chance – maybe one of you would like to do that too? The circuit diagram in KiCAD is available.
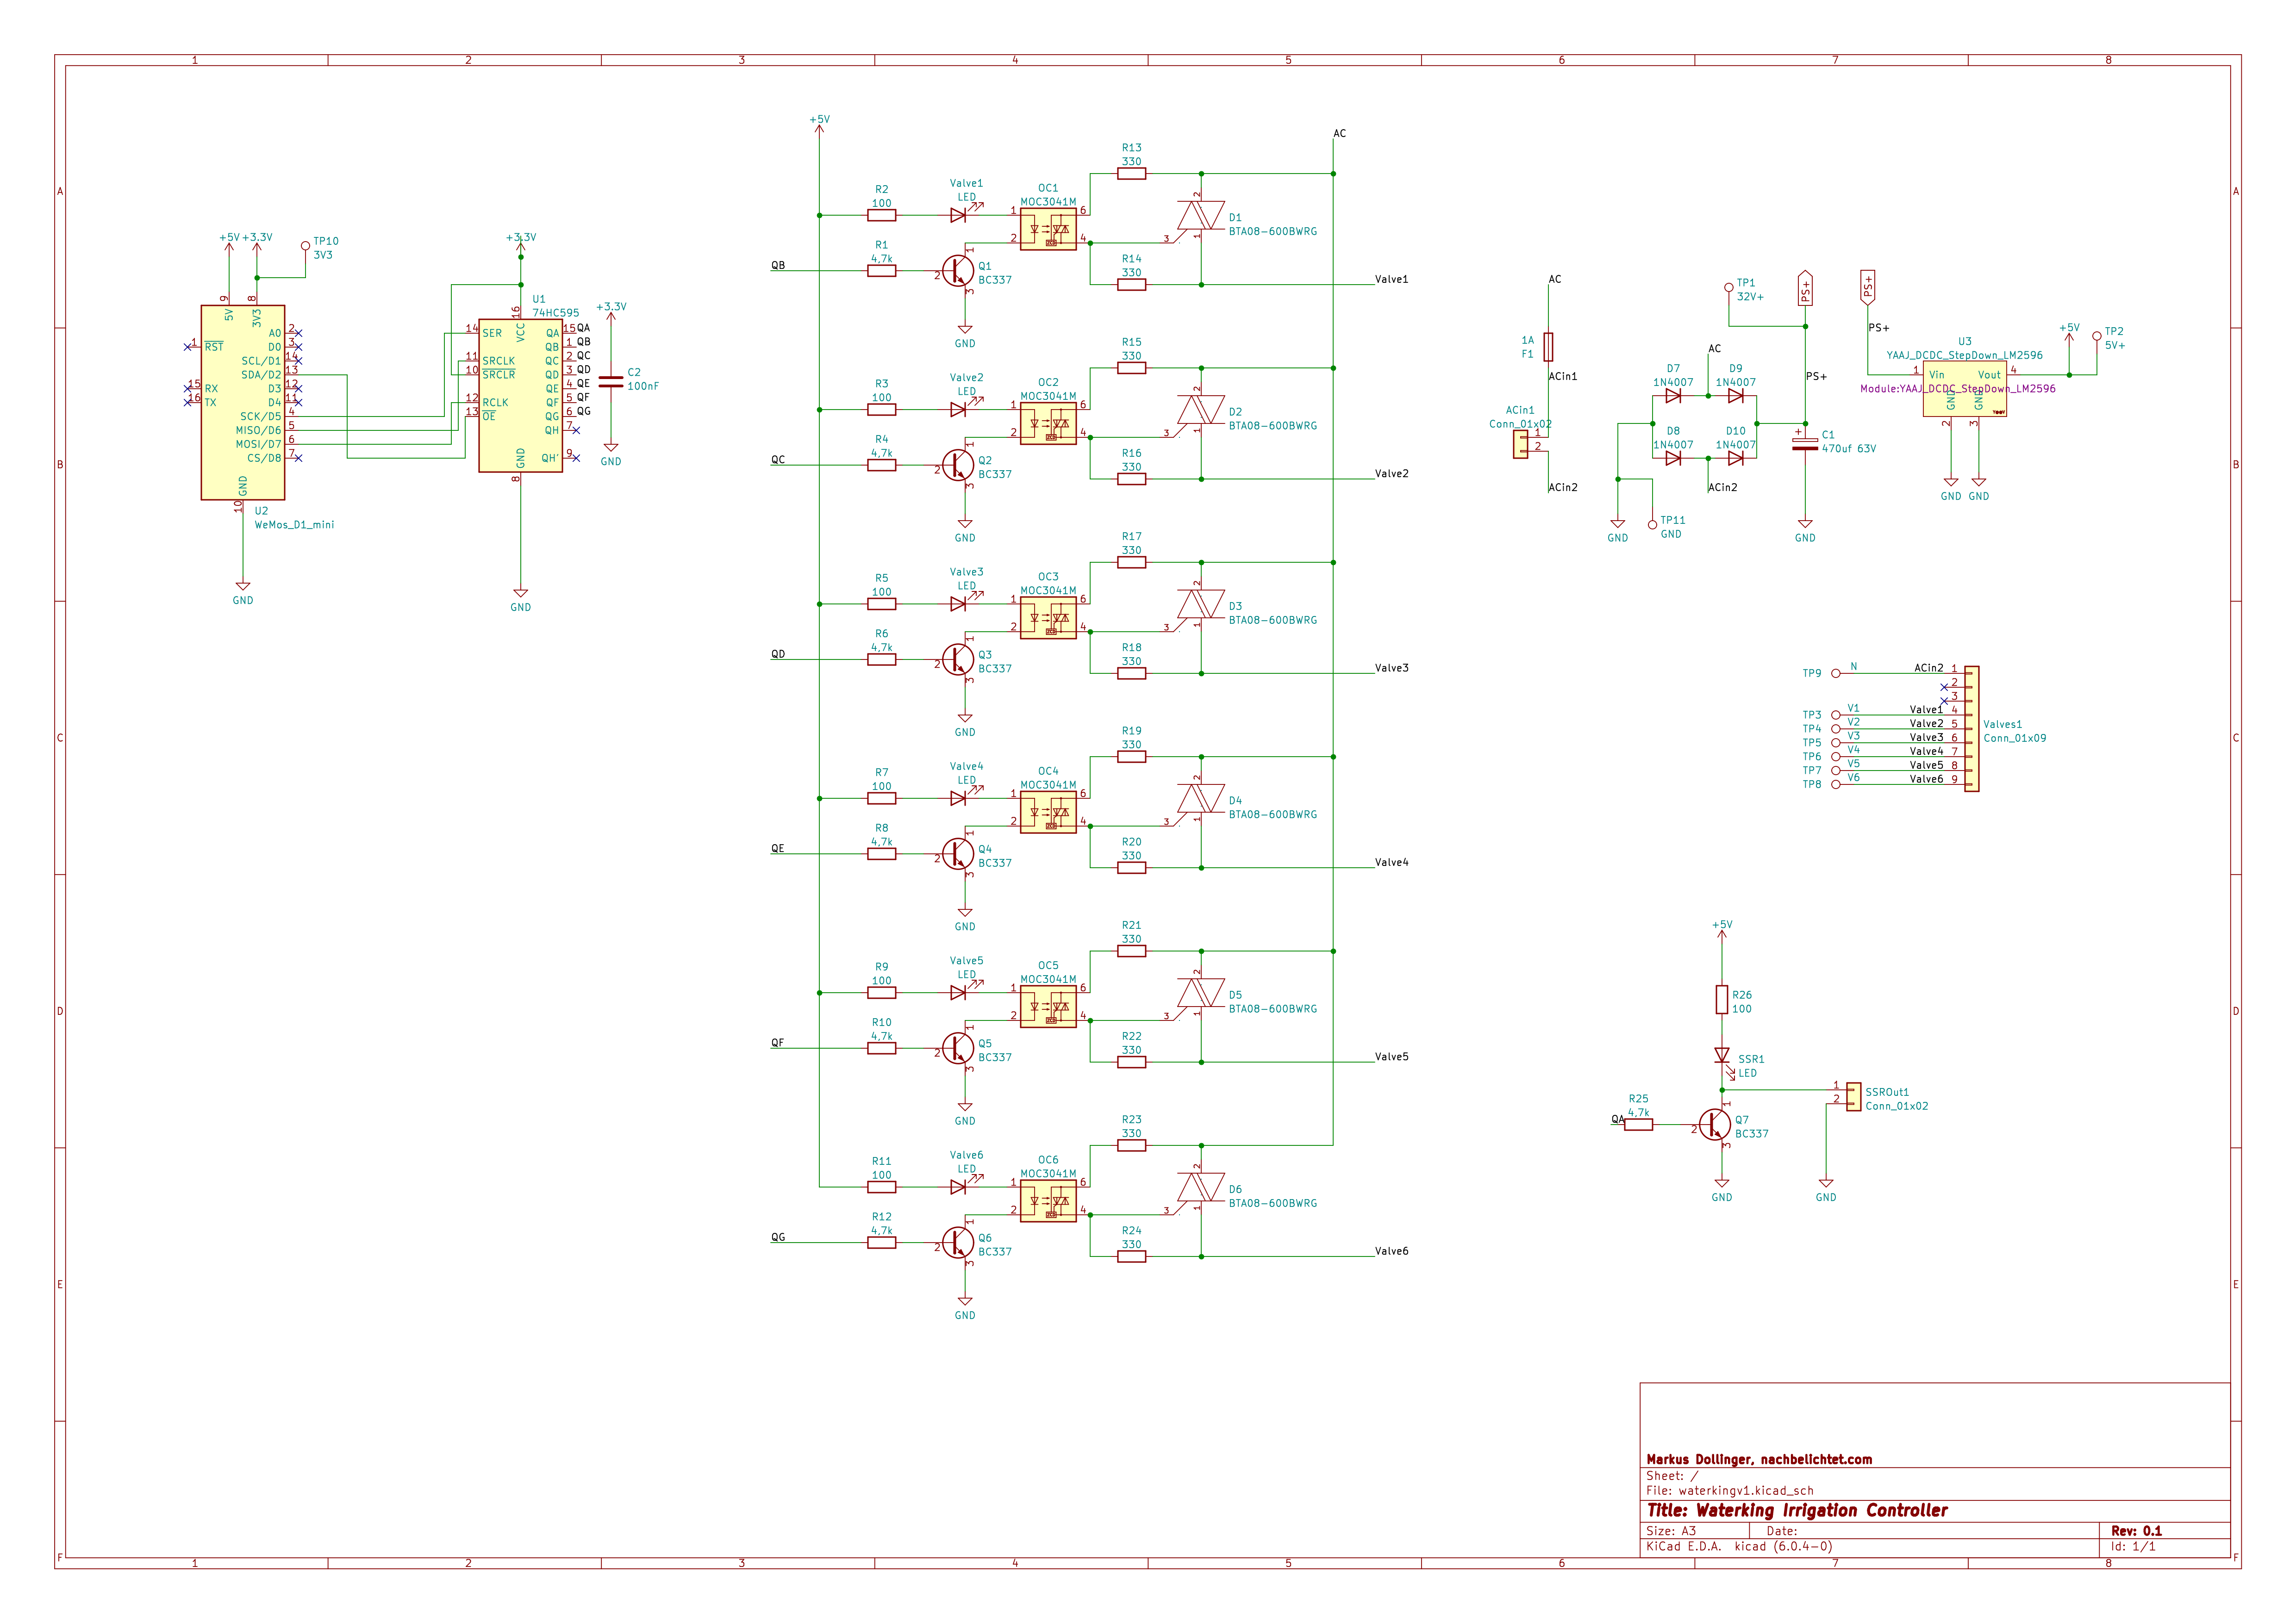
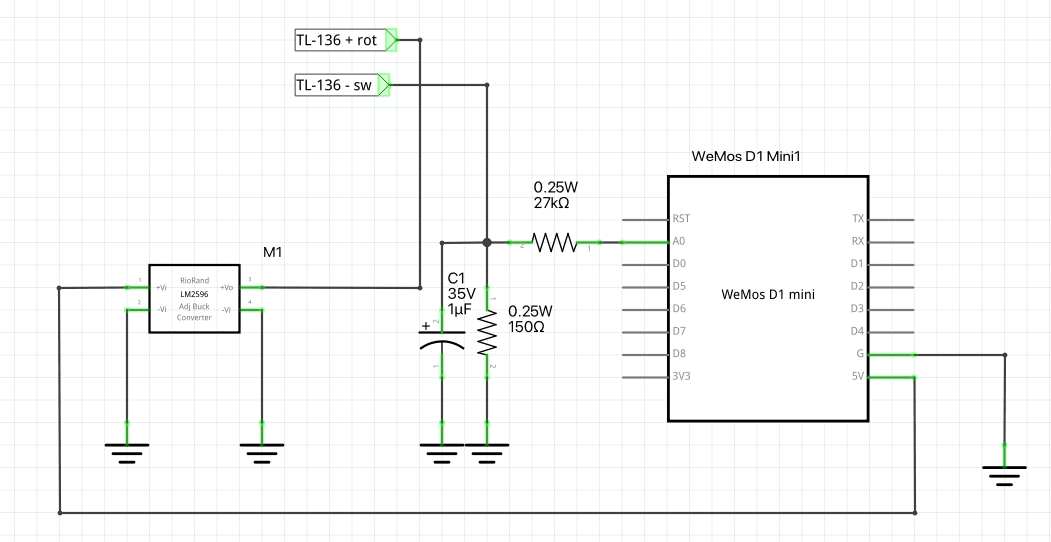
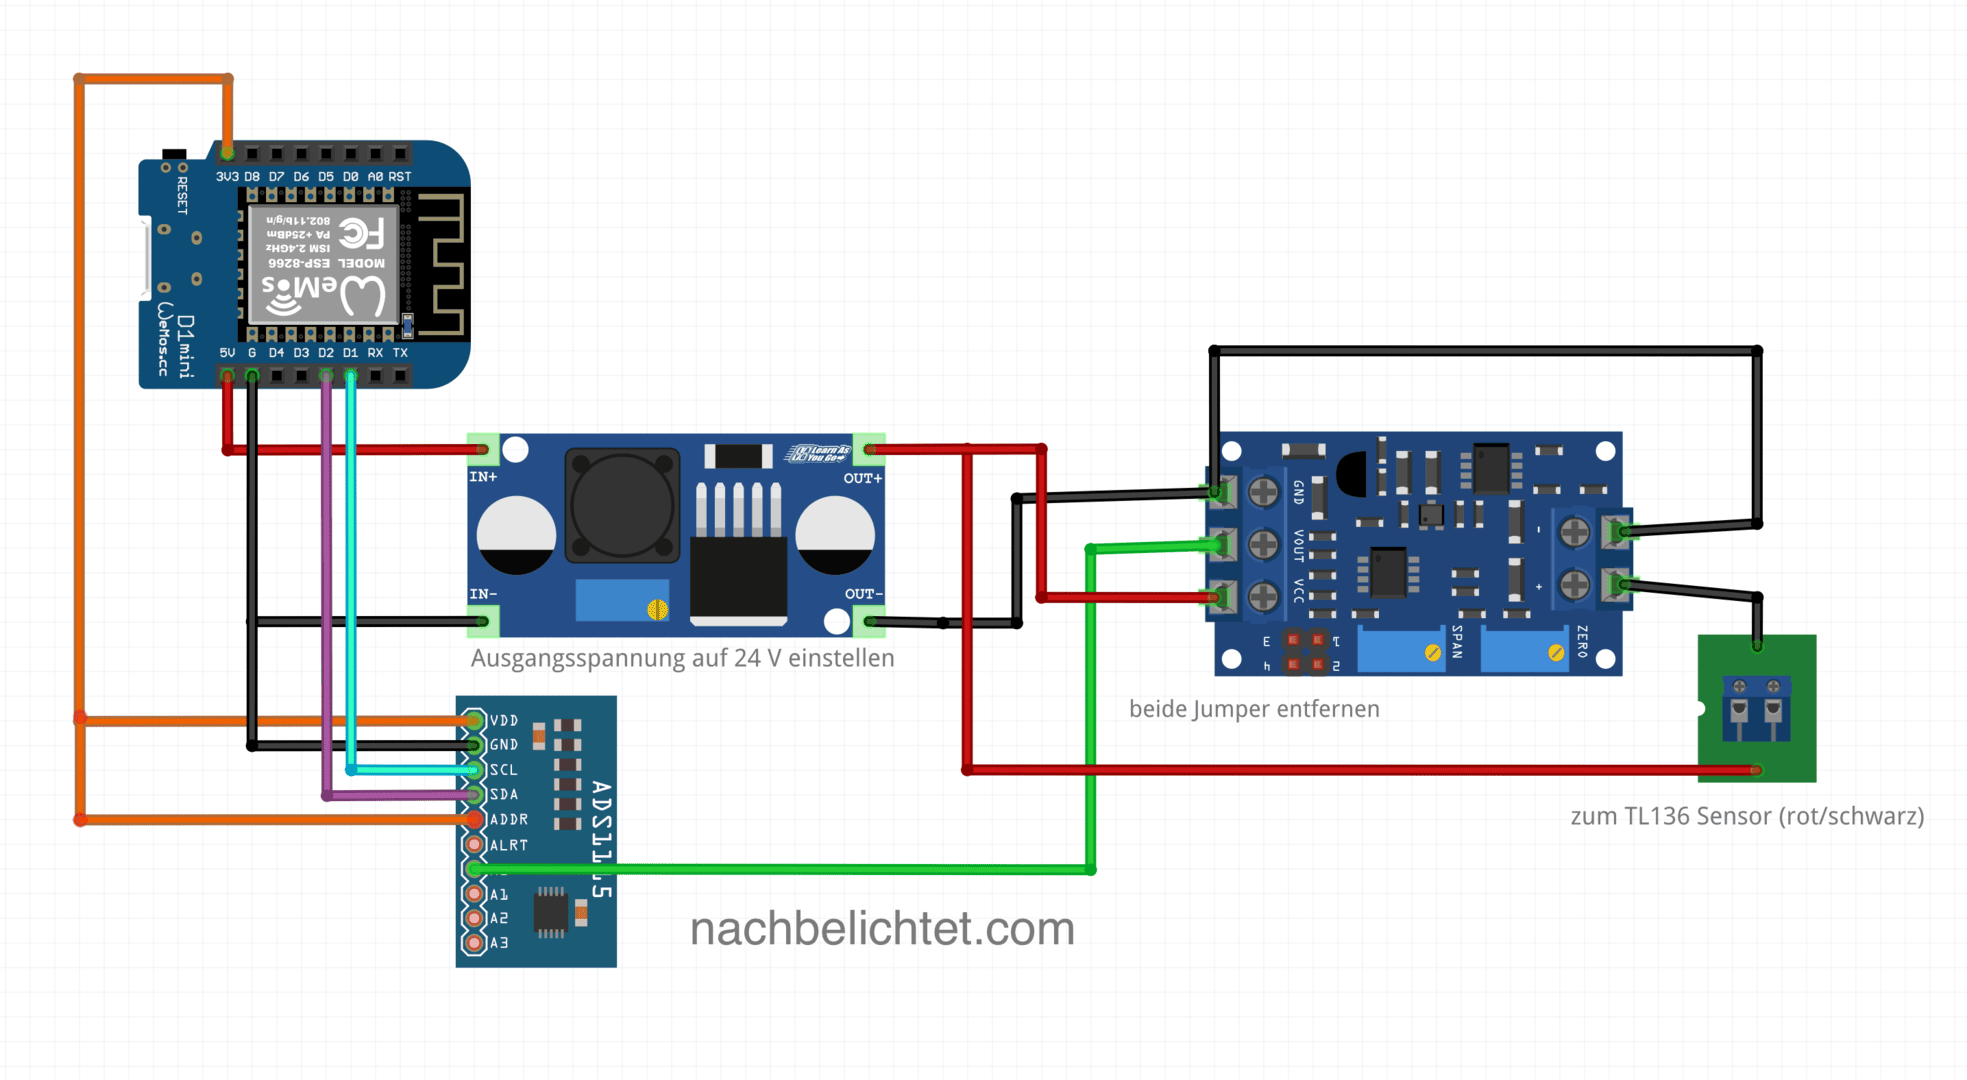
Circuit diagram without display and encoder
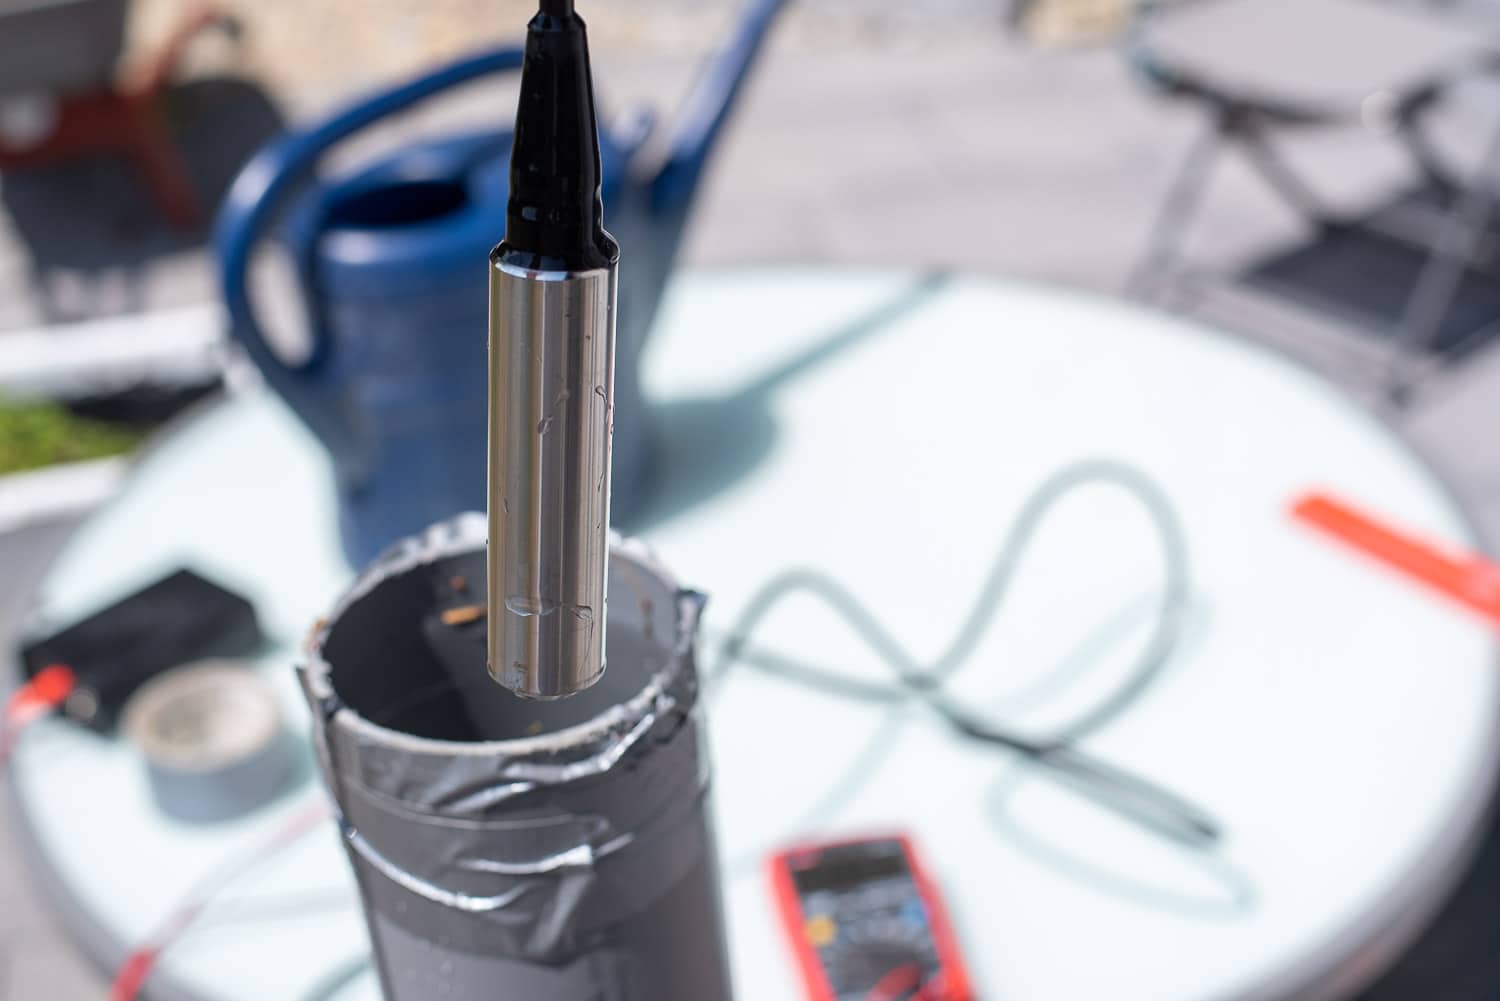
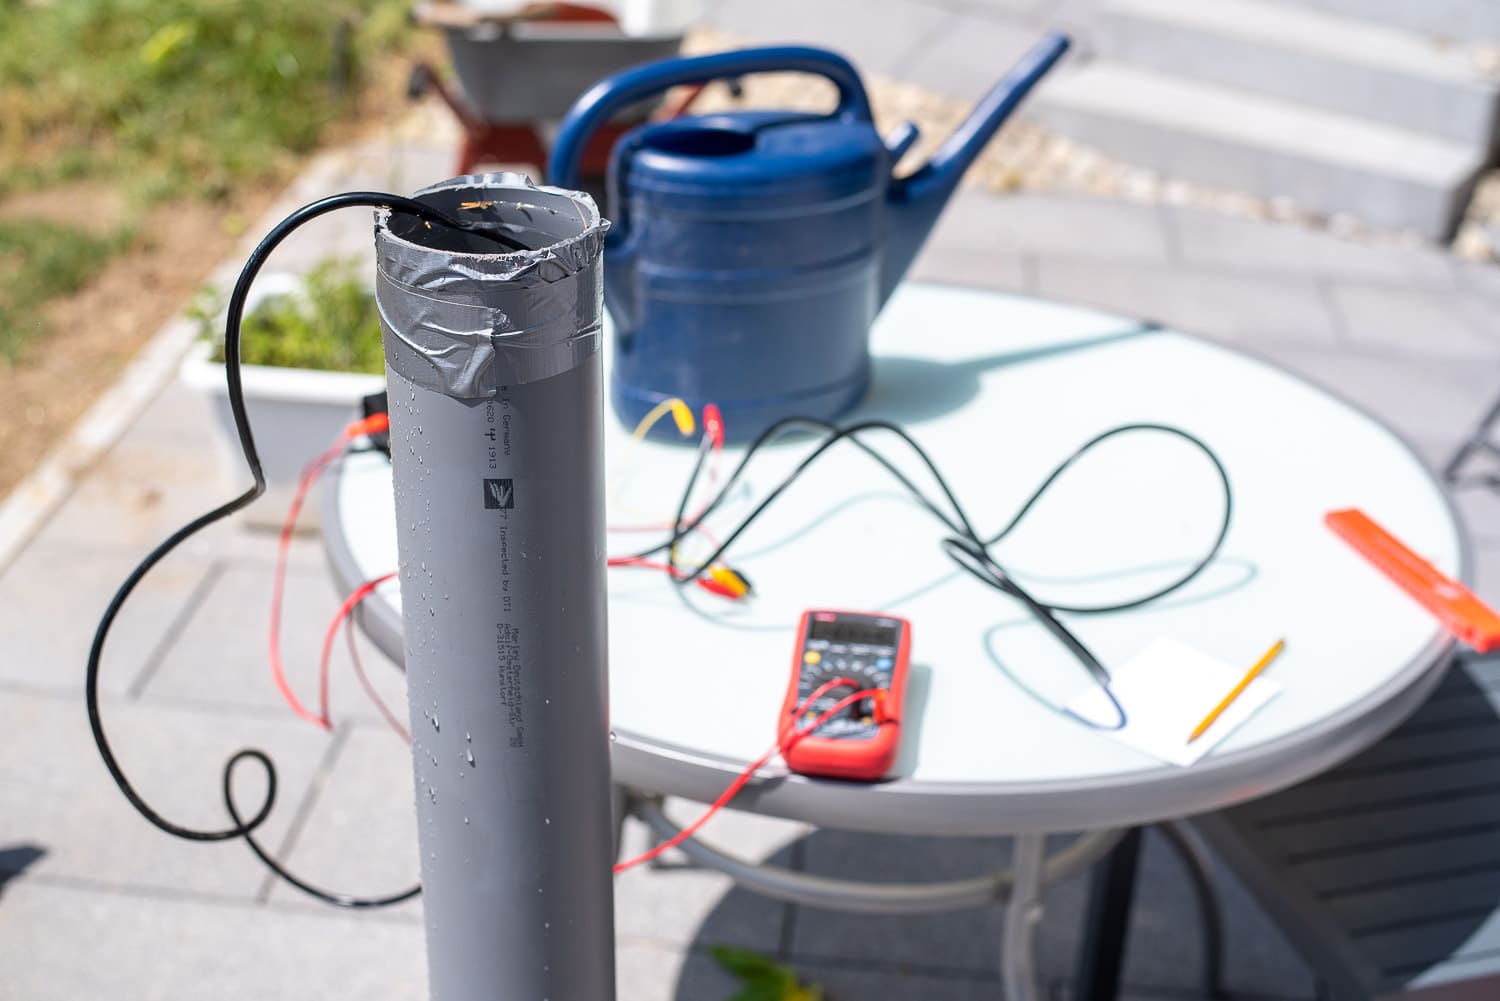
Using a rotary encoder and the LED display, I can not only display the status of the valves (in addition to the LEDs on the optocoupler), but also switch them on and off directly on the controller. Other menu levels show the water level of the cistern in centimetres and litres, the strength of the WLAN signal, today’s water consumption and the time. I have described how to build the water level meter with a TL-136 sensor here: https://nachbelichtet.com/wasserstand-in-zisternen-mit-homeassistant-esphome-und-tl-136-drucksensor-messen/

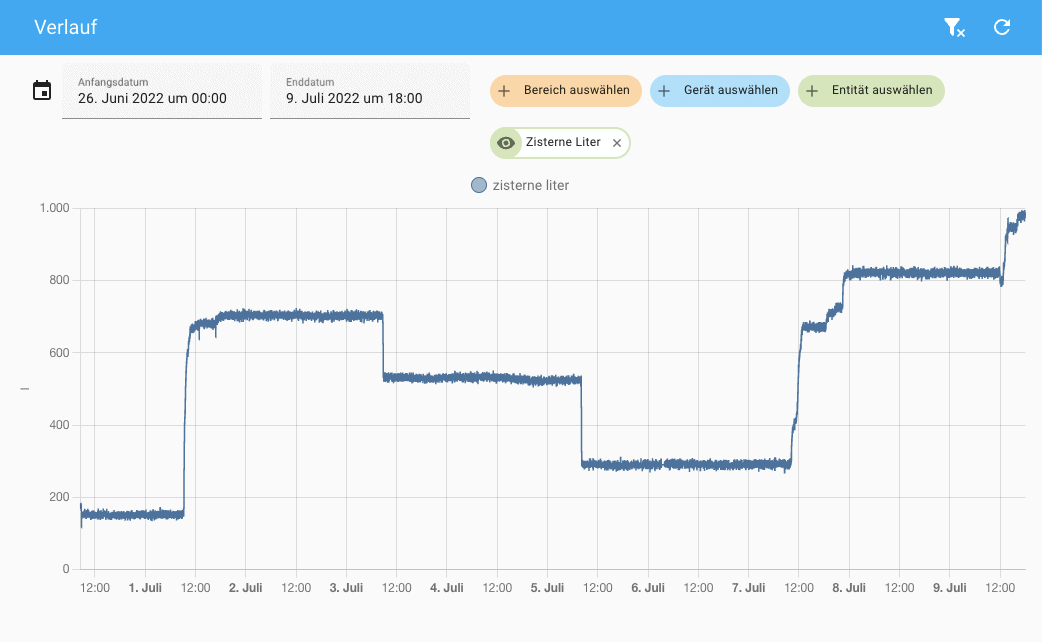
Water level in the cistern
You can change levels by simply turning the encoder. Pressing the button takes you to the setup menu for the valves. A dash indicates an inactive valve, a box an active one. The decimal point indicates which valve has just been selected and a long press on the button switches it on or off. A short press takes you back to the main menu.
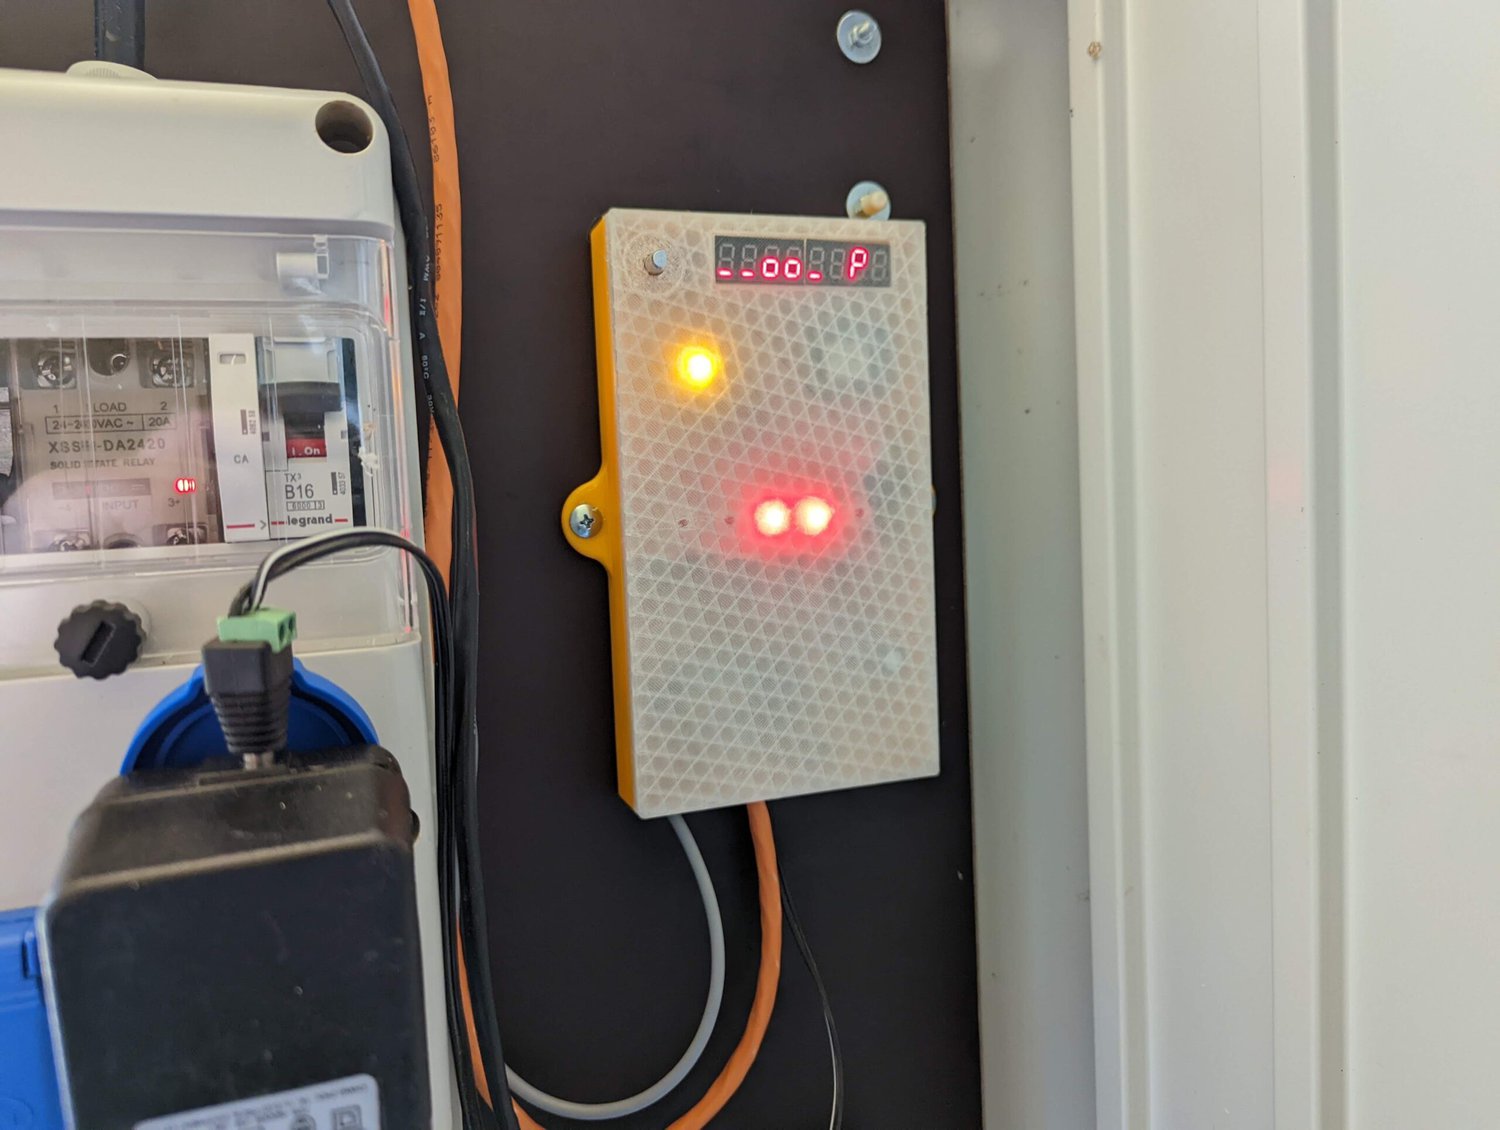
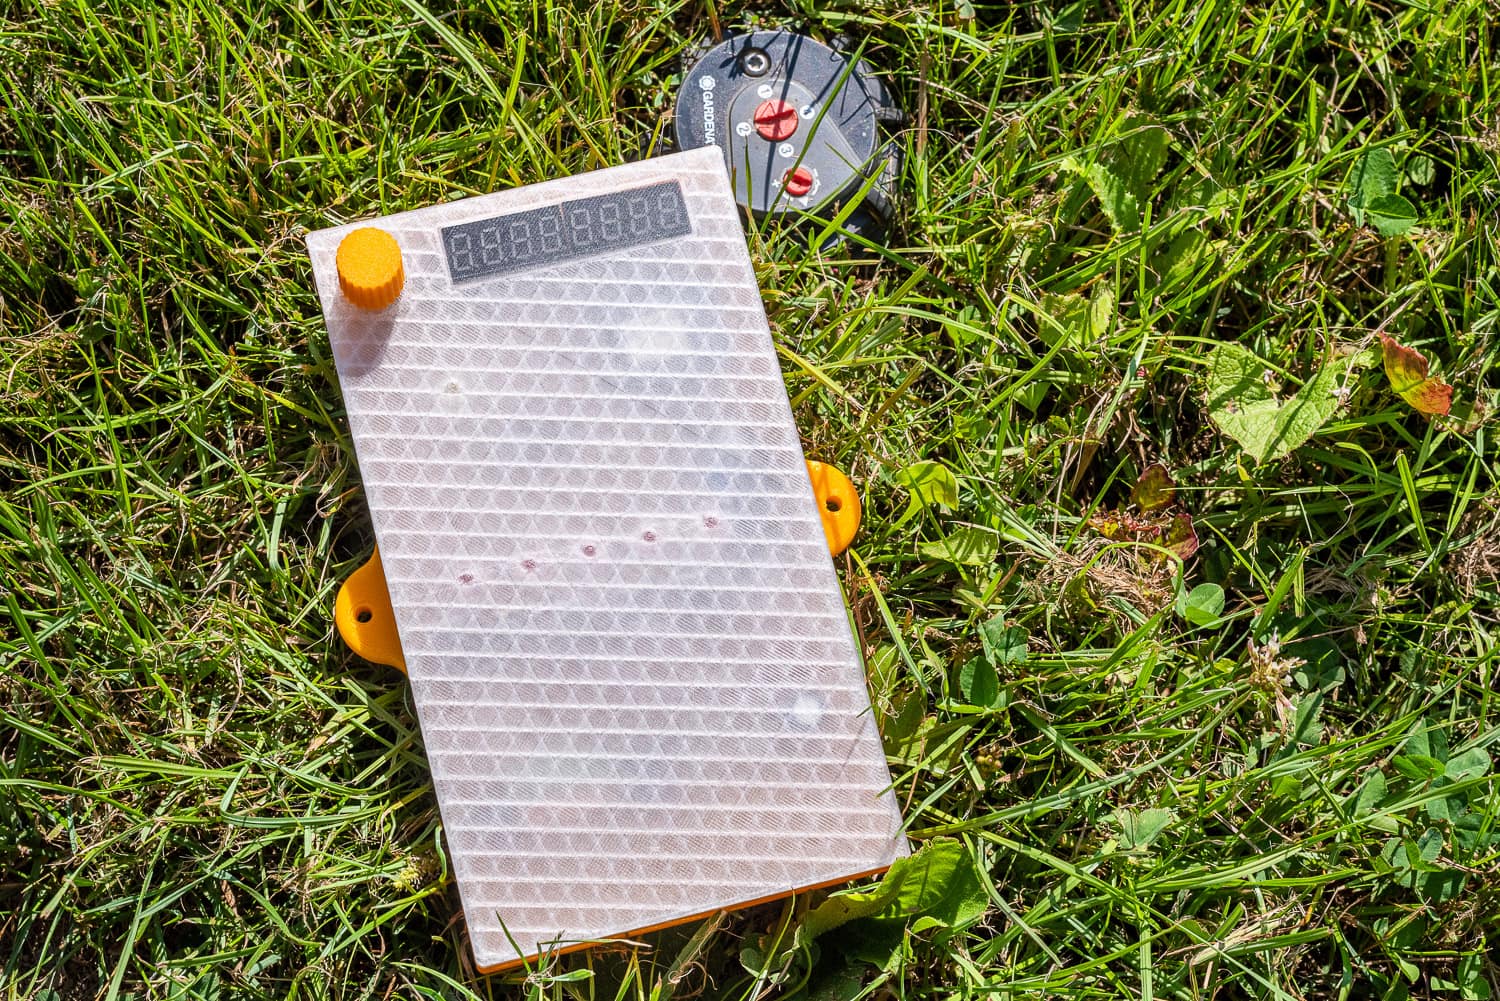
The Waterking in use
I was once tempted to create a convenient menu with a simple 8-digit LED display. It doesn’t always have to be an OLED or LC display and the LED display is very robust, which is not unimportant at -20 to 50 °C in the shed.

The various menus and settings in the display
By checking the water level in the cistern, I can deactivate the pump if the water level drops below 12 cm. A long press on the encoder button switches off all valves and the pump immediately.
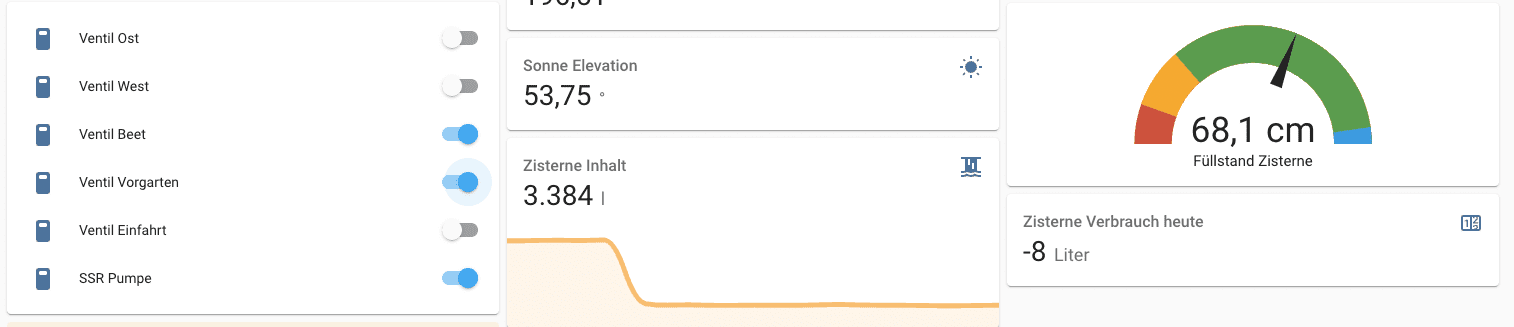
Valve control in Home Assistant with cistern water level
Interlocking the outputs prevents certain valves from being active at the same time. This not only prevents a drop in pressure, but also prevents the power pack from being overloaded. A maximum of 3 valves(Gardena Micro Trip dripper raised bed, front garden and water withdrawal) can be active and only one of the two circuits for the lawn area. The controller also provides this safety function directly – regardless of what else I would configure in Home Assistant.
3D-printed housing for the Waterking
To ensure that everything is properly packaged and looks good, I printed a housing from PETG and PLA. The transparent PETG allows the LEDs and the display to shine through.
Housing with abstracted model of the circuit board
For the display cut-out, I chose the layer thickness during construction so that no infill is printed. This makes it look like a transparent film.
The entire housing can be closed without screws and the circuit board is also only held in place by snap fasteners. With a handmade circuit board, the construction of a housing with a lid is not entirely trivial, but it worked on the first attempt and print.
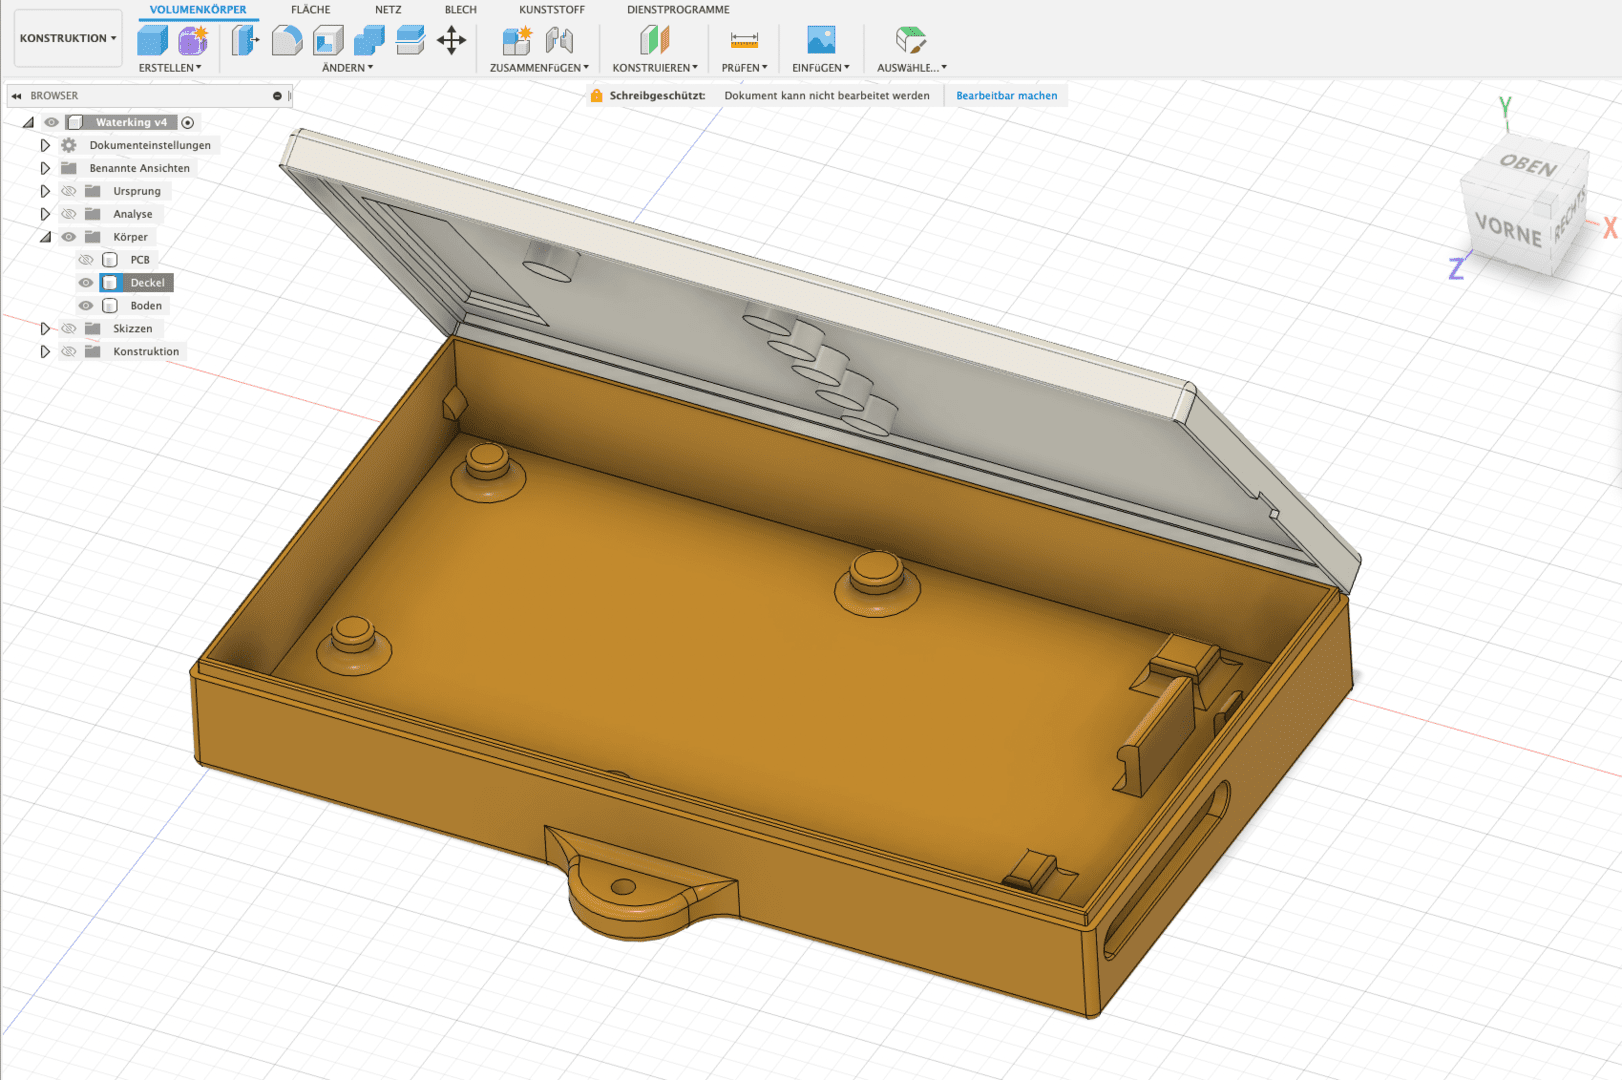
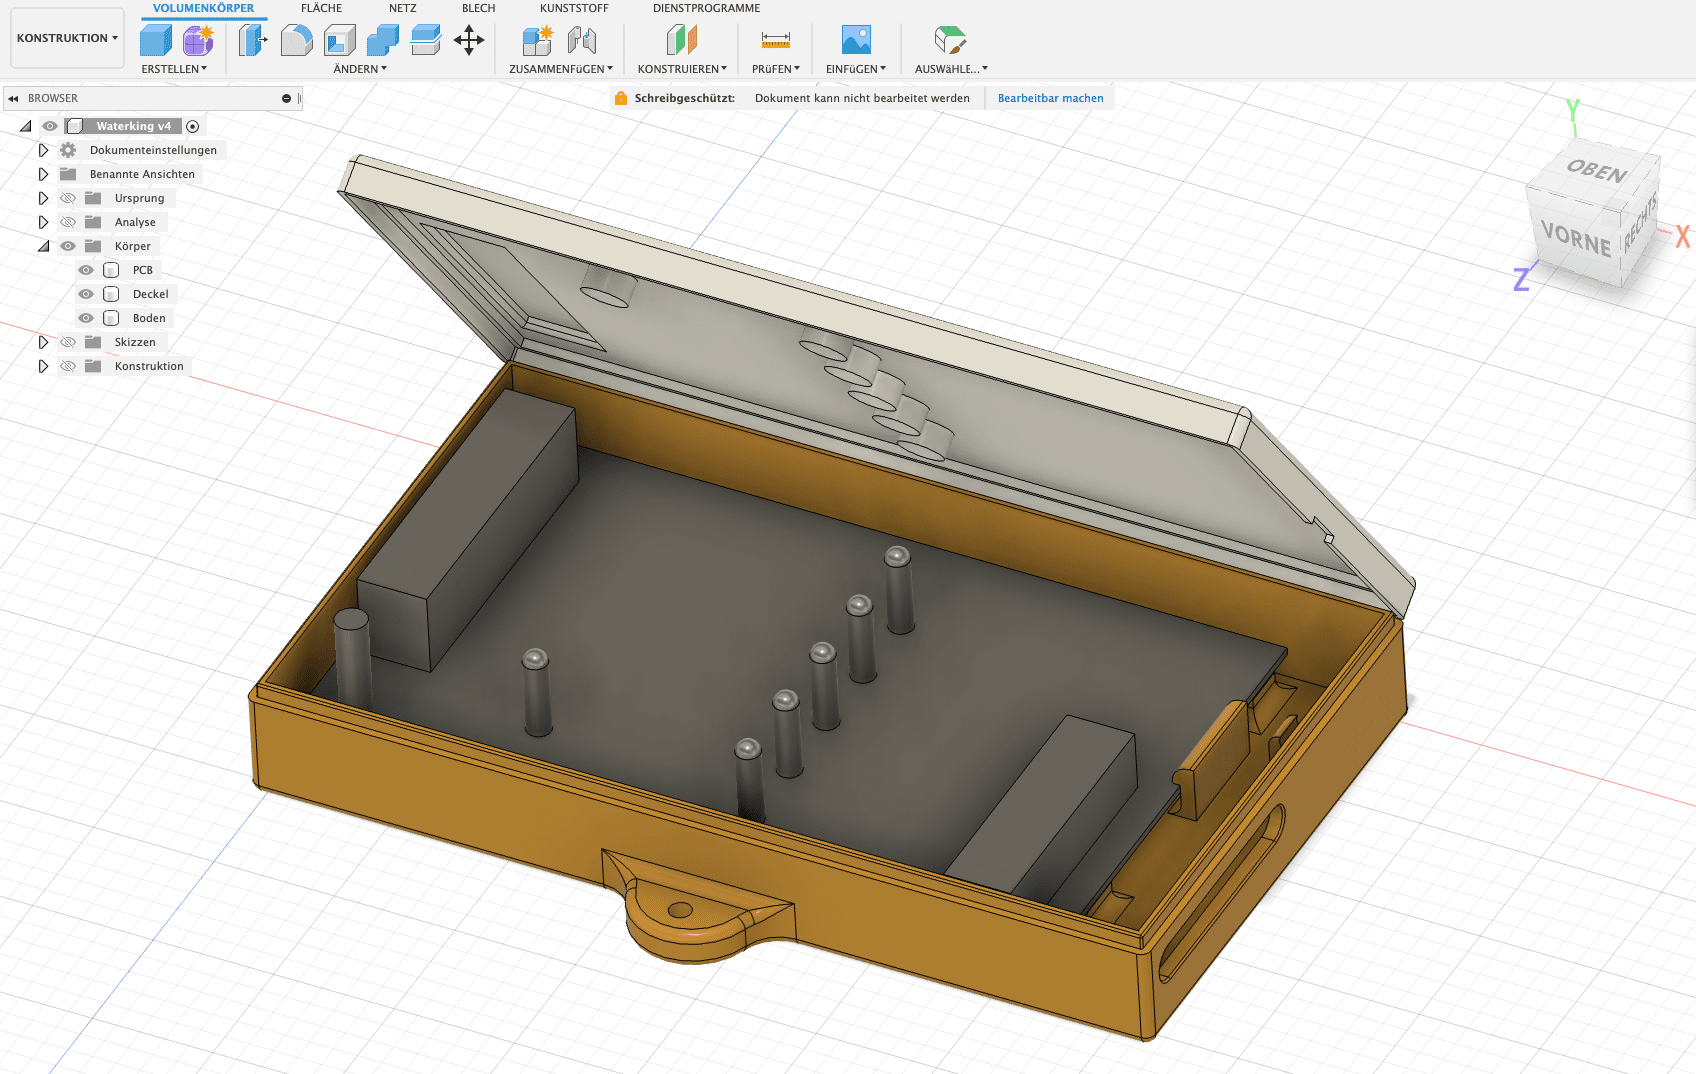
Construction in Fusion 360
A holder for a spare fuse is also included as a gag. Access to the connection terminals is from below. As always, I used Autodesk Fusion 360 for the design. My Creality Ender 3 did the printing in about 10 hours.

Access to the connection terminals

If you don’t want to go to the trouble of controlling the valves, you can also use an SSR board instead of the triacs, which you can get for less than €20. Here you only have to control the channels with the ESP. The code below can also be used for this.

SSR module with 8 channels.
I have annotated the YAML configuration in ESPHome accordingly:
1 2 3 4 5 6 7 8 9 10 11 12 13 14 15 16 17 18 19 20 21 22 23 24 25 26 27 28 29 30 31 32 33 34 35 36 37 38 39 40 41 42 43 44 45 46 47 48 49 50 51 52 53 54 55 56 57 58 59 60 61 62 63 64 65 66 67 68 69 70 71 72 73 74 75 76 77 78 79 80 81 82 83 84 85 86 87 88 89 90 91 92 93 94 95 96 97 98 99 100 101 102 103 104 105 106 107 108 109 110 111 112 113 114 115 116 117 118 119 120 121 122 123 124 125 126 127 128 129 130 131 132 133 134 135 136 137 138 139 140 141 142 143 144 145 146 147 148 149 150 151 152 153 154 155 156 157 158 159 160 161 162 163 164 165 166 167 168 169 170 171 172 173 174 175 176 177 178 179 180 181 182 183 184 185 186 187 188 189 190 191 192 193 194 195 196 197 198 199 200 201 202 203 204 205 206 207 208 209 210 211 212 213 214 215 216 217 218 219 220 221 222 223 224 225 226 227 228 229 230 231 232 233 234 235 236 237 238 239 240 241 242 243 244 245 246 247 248 249 250 251 252 253 254 255 256 257 258 259 260 261 262 263 264 265 266 267 268 269 270 271 272 273 274 275 276 277 278 279 280 281 282 283 284 285 286 287 288 289 290 291 292 293 294 295 296 297 298 299 300 301 302 303 304 305 306 307 308 309 310 311 312 313 314 315 316 317 318 319 320 321 322 323 324 325 326 327 328 329 330 331 332 333 334 335 336 337 338 339 340 341 342 343 344 345 346 347 348 349 350 351 352 353 354 355 356 357 358 359 360 361 362 363 364 365 366 367 368 369 370 371 372 373 374 375 376 377 378 379 380 381 382 383 384 385 386 387 388 389 390 391 392 393 394 395 396 397 398 399 400 401 402 403 404 405 406 407 408 409 410 411 412 413 414 415 416 417 418 419 420 421 422 423 424 425 426 427 428 429 430 431 432 433 434 435 436 437 438 439 440 441 442 443 444 445 446 447 448 449 450 451 452 453 454 455 456 457 458 459 460 461 462 463 464 465 466 467 468 469 470 471 472 473 474 475 476 477 478 479 480 481 482 483 484 485 486 487 488 489 490 491 492 493 494 495 496 497 498 499 500 501 502 503 504 505 506 507 508 509 510 511 512 513 514 515 516 517 518 519 520 521 522 523 524 525 526 527 528 529 530 531 532 533 534 535 536 537 538 539 540 541 542 543 544 545 546 547 548 549 550 551 552 553 554 555 556 557 558 559 560 561 562 563 564 565 | |
Irrigation control with Home Assistant
Home Assistant will take over the actual irrigation control. As various sensors such as the rain sensor of the LCN-WIH weather station, rain quantity sensor and the weather forecast are already available as entities in HA, these can be used for optimal and economical irrigation.

Installation in the shed
The level measurement of the cistern is also an excellent sensor when it comes to rainfall, as it receives the rainfall from 75 square metres of roof area. If the water level in the cistern is low, you can also shorten the watering times, etc.
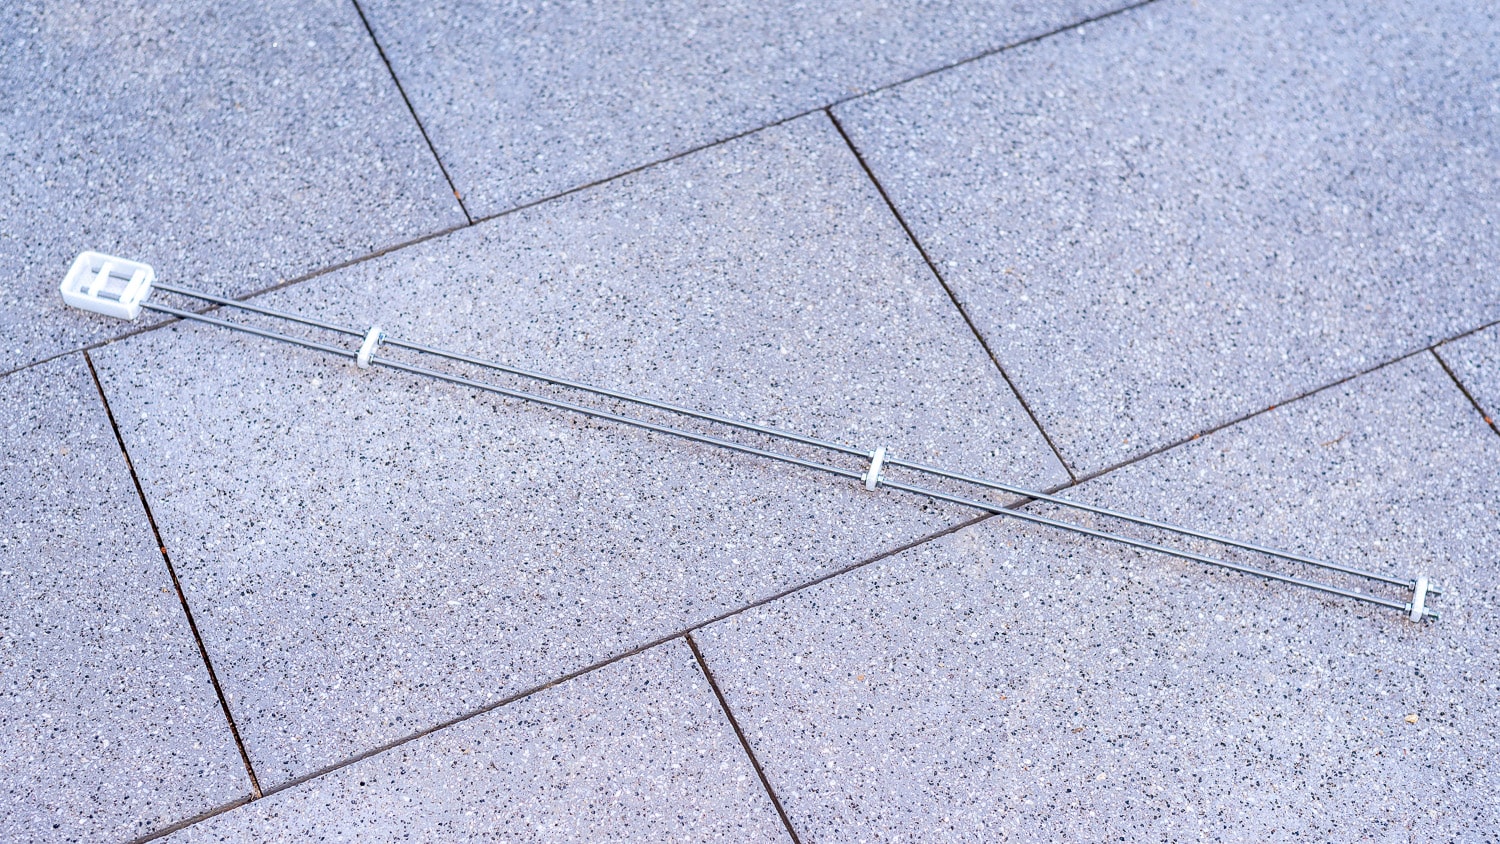
New project: The DIY soil moisture sensor
The most important values for irrigation come from a soil moisture sensor. Although capacitive sensors are relatively robust, they only measure the soil moisture in a narrow range of a few square centimetres. I have therefore built a resistive sensor from two 1 metre long stainless steel threaded rods, which are buried 20 mm apart at a depth of 10 cm.
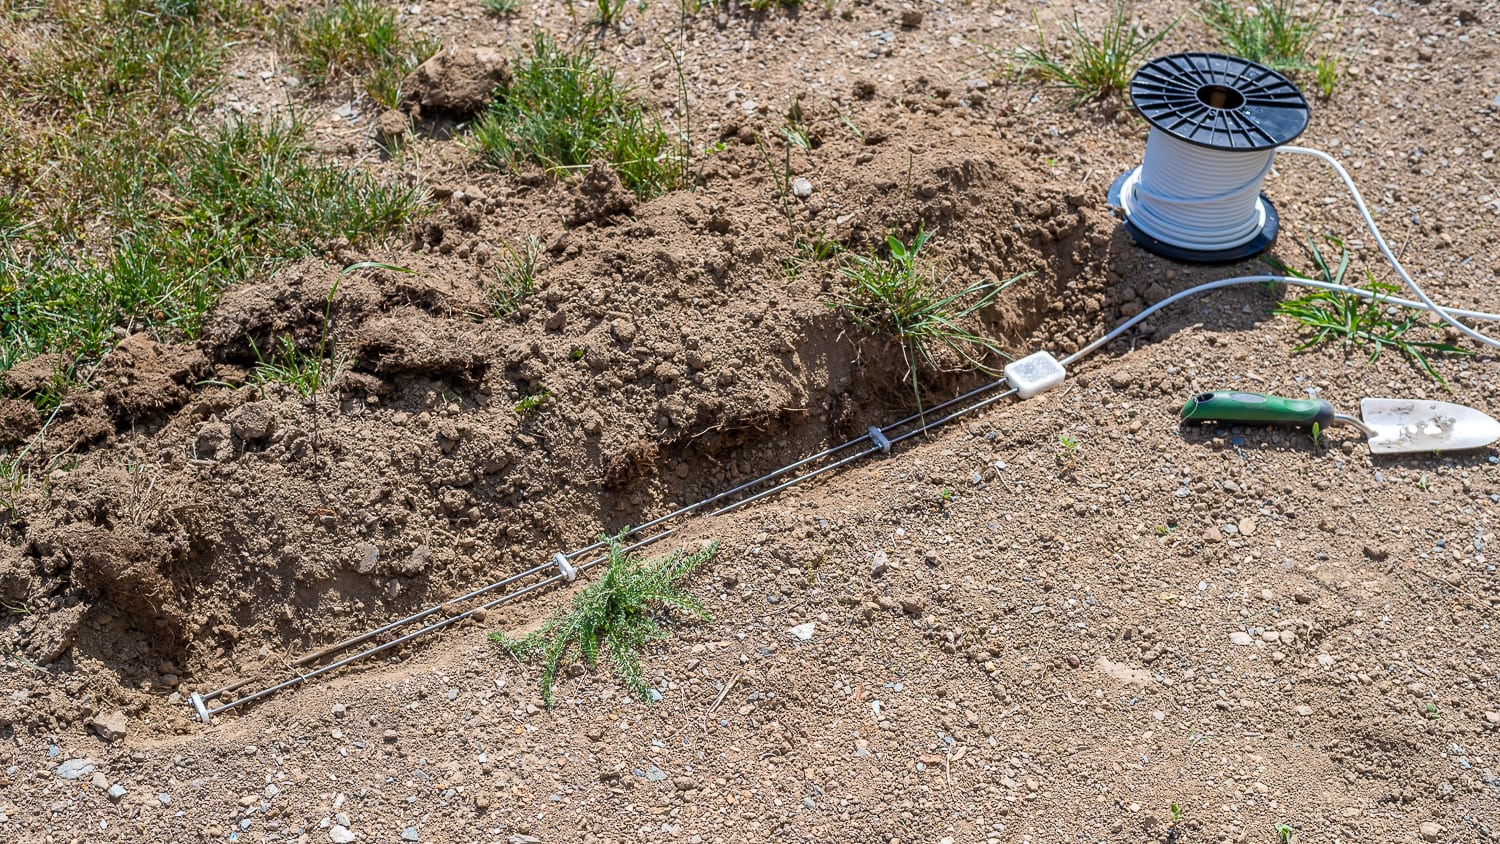
The DIY soil moisture sensor
Stainless steel is corrosion-resistant and robust. The two M5 rods cost 3 euros in the special price DIY store. With this sensor, you can measure a representative area and not just selectively. As the measuring current and the resulting electrolysis could cause salts and minerals to be deposited on the electrodes over time, the measurement is only activated very briefly and at longer intervals. There will be a separate article on this.